Check out the results here.
I'm just a little excited. :)
Tuesday, August 4, 2009
Friday, July 31, 2009
My take on the 'Throwdown' bag
I was recently visiting the Tiny Seamstress blog, when I noticed a friendly little competition. The challenge was to design a bag based on simple bag pattern brought to you by Tiffany of Tiny Seamstress Designs. As long as the basic bag and dimensions were the same, we have free rein. Fun! I'm always up for a great sewing challenge!
Here's what I came up with:

I've been considering making a bag for Peanut for some time. As he gets older (he's almost 3!!!), he's starting to walk on his own as opposed to constantly being harnessed in the stroller. Plus, he doesn't really need a diaper bag chuck full of stuff - a snack, a juice box, a couple diapers and he's good to go! He loves helping out and enjoys carrying things for me. Lately he's been carrying his own bag of books to the library, but all my totes are just too big for him. So, I thought it would be nice if he had a little backpack for our outings.

I decided to do a bit of quilting for his bag as well as applique his hand on the front. (He has a little obsession with tracing his hand lately, so I thought he would appreciate that detail :)) I also did a little stippling on the pieced part of the bag (my own recent obsession).

The back has two simple corduroy straps that are sewn to the top of the bag. I attached ties in the side seams of the bag and the ends of the straps to make a couple little bows. I did it because I thought it looked cute. Hopefully it's practical too. :) Also, this way we have the option of tying the two straps together for a single strap to go over his shoulder if he gets tired of the backpack.
He already loves his backpack and can't wait to try it out!
Thursday, July 9, 2009
An amazing giveaway!!!
Judi over at Green Fairy Quilts is having a stupendous giveaway to celebrate her 100th blog post. She is giving away four and maybe even five of her lovely products including a quilt pattern, quilted bag, and more!
The "nice" side of me wants to share this great news with everyone. The "naughty" side of me wants to selfishly keep this fabulous news to myself. Shocking, eh! Well, Judi was nice enough to throw in 5 entries to anyone who blogged about her giveaway, so I guess I feel better ;).
Also, take some time to read about the charity Judi and her husband have organized. I wish I had a quilt laying around to donate, but I can barely stay on top of my own sewing projects lately. Maybe as my piles of fabric scraps and little kiddos grow, I'll have the resources and time to donate to this worthy cause.
Go check it out!
Monday, June 22, 2009
what I've been up to the last couple months...
I've been just a little preoccupied with the latest addition to our family. Our precious baby girl arrived in late April, and we have been busy loving and cuddling her. She's our little Sweetie. So, that's why I haven't been blogging very much lately. My understandable (I think) and lovely excuse.

In the midst of the snuggling, I have been able to finish a few sewing projects. I haven't been able to make all of my ideas a reality, but I have the rest of her life to make little dresses and girly things, right? :)

I sewed up a pair of kimono-style pjs for Sweetie from Amy Butler's "Little Stitches" book. The blanket in the first photo is also from this book. There are some cute projects in there! I'm excited to sew some more projects from this book for Sweetie and also for baby gifts.
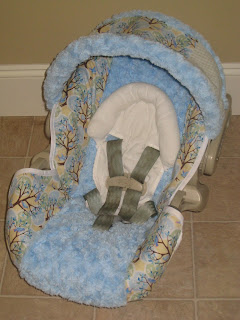
Before Sweetie arrived, in the midst of nesting I decided to give the car seat a good cleaning. Well, after much scrubbing, the car seat still didn't look 'great'. So, I decided to sew a carseat cover. I made a pattern by removing the existing cover and pinning muslin to it. I didn't line or quilt it with any other fabrics. It fits nicely over the existing cover and it comes off easily for washing. Bonus!
Here are a couple 'non-baby' projects:

I sewed an apron for my niece's birthday. I added a little gathered inset for fun - I had to do a little girly sewing :).

I also painted a tree in Peanut's room last week. Slowly, but surely, his room is coming together.
Yep, we're staying busy over here. But it's a good busy - it keeps me out of trouble ;).
Saturday, March 14, 2009
Darling Daisies

Today I decided to take a break from my big sewing projects. I just needed a little project that I could start and finish within a couple of hours to get the creative juices flowing again. The best parts of sewing, for me, are the beginning and the end. I love finding inspiration, designing patterns and coordinating fabrics. I also love the satisfaction of finishing a project and using or enjoying it. The middle is where I get stuck. So, to break up the monotony I like to find quick projects that help keep me motivated to finish the larger, more tedious ones.
I recently found this tutorial online, and today seemed like a great day to make a couple fabric flowers. They brighten up my sewing area and just, plain make me smile :).

Thursday, March 12, 2009
I'm back...and with a new diaper bag for me!
Yes, I'm still around :). However, I've been camera-less. I finished a custom order diaper bag several weeks ago as well as a pouch carrier for the new baby. I've decided to wait until I have the baby to post pictures of the carrier. It's hard to demonstrate proper "carrier technique" without an itty bitty :).
I've also been working on my son's quilt off and on. I really need to get moving on his quilt, though, because I'd really like him to be in his "big boy" bed before the baby arrives. He is currently sleeping in the baby room while his new room transforms from the office to a bedroom. It really wouldn't be the end of the world if we didn't move him into his new room until later, since the baby will be in our room for the first while. But with Peanut, I would often do night-time feedings in the baby room to let hubby sleep better. You're welcome, honey :). So, it would be nice to get everyone and everything organized and settled in the next couple weeks. Perhaps the nesting instinct will really kick in one of these days...
Anyways, here's the project I finished last week: a diaper bag for our new little blessing. I couldn't sleep one night, and this bag design worked it's way into my brain. I got up long enough to make some sketches and start thinking about fabric options. Since we don't know if the baby is a boy or a girl, I tried to come up with something neutral. I have to say, now that it's finished, it's a tad on the girly side. But if the baby is a boy I'll probably just take off the flower yo-yos on the front and call it good. Besides, I'm the one who has to carry it - that makes the girlishness ok, right?

It was definitely fun to make some baby items for myself the last couple months. After making so many custom orders for other babies, it's nice to look forward to using some items myself. Hopefully I'll get some ideas for improving my bag-making techniques as well. Sometimes I feel bad making custom orders when I myself haven't tried out the designs. Who knows, maybe there will be some new bag designs in the near future! :)

I also made a diaper changing kit very similar to a custom order from last month. I made it a little smaller and attached the change pad to the bag with snaps.


Monday, February 2, 2009
The Little Diaper Bag That Could
This diaper bag was my first custom order of the new year. My friend wanted a smallish diaper bag that could fit a few diapers, a wipes container and two bottles/sippy cups. She also wanted to have a change pad. Initially the plan was to have the change pad attached to the bag in some way, but in the end we decided to make it detached. (I'm still mulling over the idea in my head, though. I may try to come up with a design that has a change pad that is attached but can be removed with a zipper, buttons or maybe snaps.) Hmmmm. But anyways, I digress, here's the bag we came up with:


My friend sent me a picture with an idea of what kind of bag she wanted. The front flap in the picture had a funky curve in it. I decided to make a curved flap and also added some embroidery since the flap drew attention to that part of the bag.

The back has a pocket for the change pad.


The change pad has a layer of clear vinyl to protect the fabric from baby messes.
This bag was so much fun to make! I'm also really liking the design. I may make one for myself. I'm also contemplating making a few for my Etsy shop.
Subscribe to:
Posts (Atom)